Imaging a Lab with DeployStudio
Imaging is a great thing..it really is. When you have more than 2 computers, imaging becomes your best friend…and if you buy new machines or one of your older machines dies or gets messed up, it saves so much time. I have a complete backup ready to deploy at all times for both Mac and Windows.
I image my lab once a year. This ensures that I have the latest updates for every machine for all programs, but it also cleans out the old stuff from the previous year that builds up over time. Apple makes imaging very simple by installing a NetBoot feature on all of their machines and including a NetBoot server installed with MacOS X Server. In the past I used Bombich NetRestore, a free AppleScript based program that helped make NetBoot image sets and helped with deploying them. Mike Bombich stopped making NetRestore and suggested everyone to try DeployStudio for imaging..so I did. I must say that DeployStudio is an amazing program especially for a free program. It’s also very simple to get running and fairly robust. In this post I’m going to go over image creation, setup, and deployment with DeployStudio (DS) and also go over some issues I encountered and how I fixed them.
Creating the NetBoot Set
The first step to any Mac NetBoot is the NetBoot set. What the set is is a basic image file that includes all the tools your computer will need to read the image, copy the image, and even run checks on your computer even if you’re not imaging. It’s a very basic MacOS install that resides on the server. DS creates these images for both PPC and Intel machines in the same set, so any Mac can boot from the same set. After installing DS on your server you can open the DS control panel and begin setting up your system AND create your NetBoot set. I will not be going over server setup in this post, I may save that for a later time.
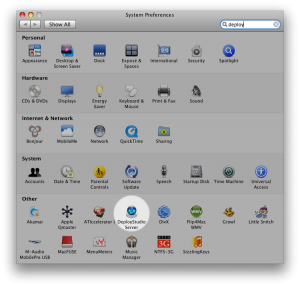
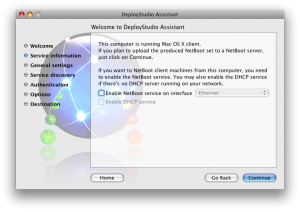
When you open the control panel you should launch the assistant (you can also find it in /Applications/Utilities). When the assistant opens you select “Create a DeployStudio NetBoot set and continue. If you’re running the assistant on a computer other than a server you will see this:
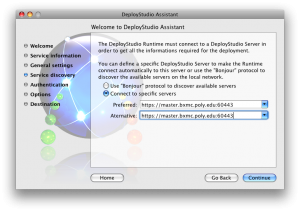
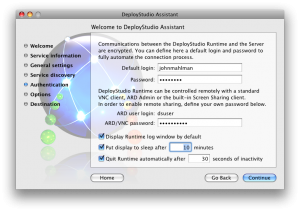
If you plan on using a server to do the deploying, you can skip this, if not, you’ll have to setup a DHCP server. This depends on your setup, for my case I can skip this. The next step allows you to name your set; set the name and unique identifier to whatever you wish, (unless you have multiple NetBoot sets). When you click continue you will tell the set where the computer should log in and look for the images and workflows.
The settings above are MY settings, yours will be different. The login and password for mine are supplied by the LDAP server. The final step is the actual save location and creation of the image. Pretty self explanatory. It takes about 5-10 minutes.
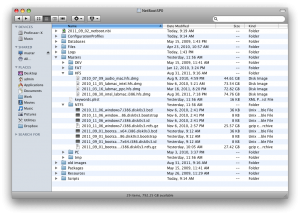
After image creating is successful you’ll have a nice .nbi file in your save location. This file is basically an image file that contains the bootable images for PPC and Intel as well as the basic MacOS system with some basic utilities like Disk Utility, Terminal and Startup Disk. It’s roughly 2.5 GB and it should be placed on your server in the NetBootSP0 folder (It’s located in [Volume]/Library/NetBoot/). Inside the NetBootSP0 folder will be other folders which DS created during install, these contain various other things for DS and also house your images. I will go over image creation next. This is where we will be able to test to see if your NetBoot Server and set are both working.
Creating Images with DeployStudio
Creating the images is an extremely simple task once you know what settings you need. I will explain the setup with my current settings but attempt to go over most of the other ones.
To start the process, boot your mac and hold the ‘N’ key down during power on, this will perform a network boot (REMEMBER: Your computers must all be on the same subnet, this is the only way to do this without messing with a lot of things!) If your computer boots to the DS screen you will see the DS Runtime Window.
This window shows all of your available jobs in DS. There are a few default jobs that come with DS, we’ll make our own later for deploying. For now we’re gong to select “Create a master from a volume.” Click the Play button at the top and you will come to the heart of the Image creation.
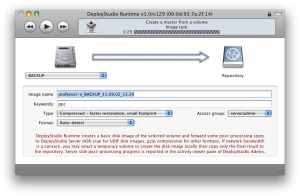
This window is probably the hardest window we’ve seen so far. First thing is to choose which drive you will make an image of from the dropdown menu. I’ll start with my MacOS partition. After selecting the correct partition I name the image something like 2011_09_02_Intel_lab and leave other settings alone. The keywords are not very important unless you have a lot of images. I usually select Compressed for the type because it saves space and it gives a much faster restoration. Access group is what you would have set in your initial DS setup that I did not cover.
Format is what kind of image you are making. Since I’m doing a MacOS install the Format will be HFS+. I normally select “Auto Detect” but if you want to have HFS+ Journaled, Case-sensitive or both you may want to change it because it will always auto-detect HFS+ without journalising.
Once my settings are correct I click the Play button at the top and the image making process begins. This will take a lot of time depending on the size of the image being created, a 100+GB image will take roughly 2 hours (sometimes more, sometimes less, depends on the machine and network) and it will then compress the image (my images get compressed to about 75GB from 128GB…compression rocks!).
After image creation you will see the .dmg file in your NetBootSP0/Masters/HFS folder. (Note: I just found out that new versions of DeployStudio won’t show your images in DS Admin unless you have .hfs in filename before the .dmg, it will automatically add them during image creation, but if you have old images, just add the .hfs right before the .dmg extension).
You can use this same process to create NTFS, FAT, and EXT4 images. Follow the same steps but make sure you leave the Format as “Auto-Detect.” After creating a NTFS image it might take some time to show up in DS admin, this is because some server-side tasks may need to be done, it will show up when that is complete. NTFS imaging requires a little more setup in DS admin beforehand…again, I will not be covering that in this post.
Making Workflows to Deploy Images
DeployStudio comes with an administration program where you can manage images, workflows, packages, scripts, and see progress of NetBooted computers. You can also set up all of your computers in it before hand (names, network settings, licenses, etc) and set up automation for all of your systems so if you want a computer to automatically format and re-image when you NetBoot it, you can do that (please don’t think that’s a great idea…just saying). To start setting up workflows you’ll need to open DS Admin, it’s located in /Applications/Utilities. Enter your server credentials and you’re presented with the DS server information.
The window that opens first is the current (or previous) activities. In this window you can watch and control the computers that are currently working in DS. ou can also see what jobs they were doing, and how far along they are. This screen is very helpful when you have DS running on many machines.
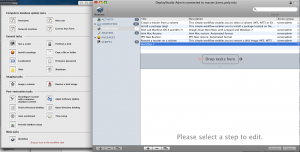
I am going to explain how to setup a dual-boot Mac workflow. The default jobs are very helpful at getting you started, I’m going to start from scratch. To create and edit workflows we’re going to select “Workflows” from the left sidebar and begin setting up our job. Click the “+” button at the bottom and you will be presented with a new blank job. Then click on the little “+” button next to “Drop tasks here.”
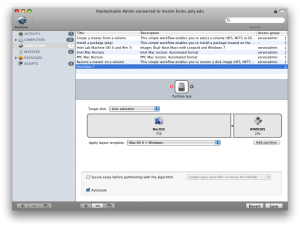
The first thing to do is to drop the “Partition a disk” task from the left side to the drop space. Then you should select “Mac OS X + Windows” from the Apply layout template dropdown menu. Resize the partitions to suit your needs, make sure your images will be able to fit on the partitions you make for your drive. I normally do 75% Mac OS/25% Windows, I also normally Automate this process, your mileage my vary.
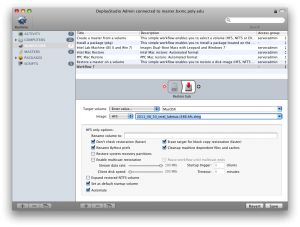
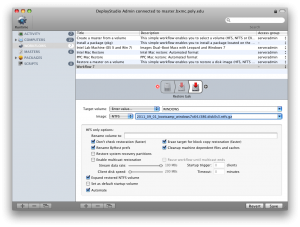
 The next step is to drag the “Restore a disk image” job from the left and drop it after the partitioning job. Your MacOS image should ALWAYS be first of else it will not work. Select “Enter value…” from the Target volume section, then select the “MacOSX” option from the menu. Set your Image to HFS and select the appropriate image from the menu (the one you created earlier). Now, for the options you can read from the image below how to set those. If you’re imaging Mac OS 10.7 Lion you should check “Restore system recovery partitions” but I don’t need this.
You may also notice Multicast settings, you can set this up if you’re brave, I don’t need it so it’s ignored. Your HFS partition is complete, now on to Windows.
Drag the “Restore a disk image” job from the left and drop it after the first restoring task. Select “Enter value…” from the Target volume section, then select the “WINDOWS” option from the menu. Set your Image to NTFS and select an appropriate image from the menu again. Settings for Windows is relatively the same as HFS with some exceptions; you should check “Expand restored NTFS partition” and uncheck “Set as default startup volume” unless you want to have Windows as your default. You’ll also notice that all of these tasks are automated, this is so you can boot the computer, select the job, and walk away without intervention.
Now, you can add more jobs to the workflow such as AD binding, or software updates, but this setup is the basic setup for a dual-boot deploy. Now just rename the job by clicking the name in the top with the other jobs and rename it, you can also add a short description of the job. Your workflow is now complete! Now it’s on to the easiest task…deployment!
Deployment
I say this is the easiest part because it really is. If you have everything set up properly, you should have no issues.
To deploy the image to the computers, boot the machines again pressing the ‘N’ key, when the machine boots to DS you can select the newly created Workflow and press the play button. If you automated everything, that’s it..it will partition your drive and load the images to those partitions. After the job is complete your computers will either tell you it was successful (or failed…more on that below) or they will reboot. If the task was successful, GREAT! Reboot the machines, they will run the final scripts in MacOS then reboot again…MacOS is done. You only have one more thing to do and that’s configure Windows. I won’t go into this because it’s going to be different for everyone, but you will have to activate windows and any other programs that require it because Windows will not keep the activation after imaging.
Issues?
Now, not everyone will be so luck to have a successful run…if you run into any issues visit the DS forums, they are very helpful and pretty speedy. I had one issue that just drove me nuts. When I ran my deployment script the MacOS partition would go fine but once Windows hit it would fail…everytime. DeployStudio keeps logs for every computer on the server, so I took a look and noticed the following errors:
[Thu Sep 1 14:41:15] dyld: unknown required load command 0x80000022
[Thu Sep 1 14:41:16] -> invalid starting block value () defined in MBR for partition /dev/disk0s3.
[Thu Sep 1 14:41:16] Check your partition map. You need to define at least one DOS/FAT partition in order to get the MBR automatically in sync with GPT.
[Thu Sep 1 14:41:20] -> Restore action completed.
[Thu Sep 1 14:41:20] Restoration failure (elapsed time: 0.24 minutes)
I posted in the DS forums (topic link) and in a matter of hours the admin of the forums posted a solution:
Sounds like the custom fdisk command fails on 10.7 DSS netboot sets. You may try to remove the one located in your netboot folder at /Applications/Utilities/DeployStudio\ Admin.app/Contents/Frameworks/DSCore.framework/Resources/Tools/fdisk.
So I tried this and BOOM, successful. It’s great when a developer helps with products so quickly…and I’ve only usually seen this with free or open source projects. So if you’re having issues, the forums are key.
I hope this post helps people out with Mac imaging and deployment. If you have any other questions or issues feel free to ask in the comments. If this post helped you or think it will help others please feel free to repost and share away!
